While checking the latest news of Covid-19, I came to know about something very interesting, the Antigen Rapid Test (ART) self-test kit. I saw a video where our Minister of Finance, Mr Lawrence Wong demonstrated the usage of the self-test kit. As the name suggests, ART self-test is a quick and easy DIY screening tool to pick up any possible infection early.
The Antigen Rapid Test self-test kit is currently available at Watson, Guardian and Unity. However, each person can only purchase a maximum of 10 kits. This is to ensure sufficient stocks for everyone.
I am very curious about how the Antigen Rapid Test self-test kit actually works. So, I decided to get one from the pharmacy to try it out myself.
Currently, there are 2 brands of ART self-test kit available at the pharmacy stores:
- Quidel QuickVue At-Home OTC Covid-19 Test
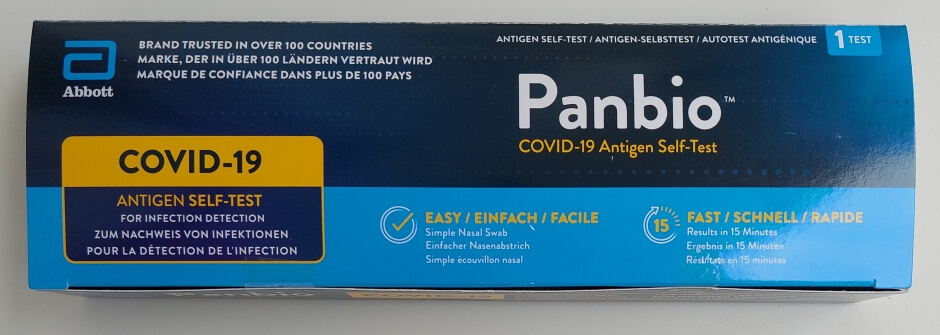
- Abbott Panbio Covid-19 Antigen Self-Test
Today, I went to Unity and I bought one piece of the Abbott Panbio Covid-19 Antigen Self-Test kit. It available in packs of 1, 10 and 20 pieces. The price is at $12.80, $101 and $201.30 respectively. For the Quidel QuickVue At-Home OTC Covid-19 Test kit, it available in packs of 2 and 25 pieces only. The price is at $20.80 and $267.50 respectively.
What is an Antigen Rapid Test (ART) Self-Test Kit?
Let’s reiterate what an ART is.
“The Antigen Rapid Test (ART) screens for SARS-CoV-2, a virus that causes Covid-19. It is a quick screening tool to pick up any possible infection early. The test is easy to do and safe, taking only less than 20 minutes.”
You may find more info on ART self-test kit at MOH’s website.
What is in the box?
Before you open the box, check the expiration date, make sure it is not expired. DO NOT use an expired kit.
There are 3 instruction guides in the Abbott Pandio ART self-test kit, English, Deutsch and French. The self-test kit consists of the following components:
- a Test Device
- a Tube
- a Blue Cap
- a Swab
- a Buffer Bottle (with 0.4 mL liquid in it)
- a Bag
- a Kit Box Tray

How does it work?
Before you start the test, wash your hands and make sure they are dry. Get ready a timing device like clock or timer. You will need it when performing the test.
The instruction is also highlighted to ensure the kit is at room temperature for at least 30 minutes prior to use. I am not sure of the objective of the 30 minutes waiting time at room temperature. I guess it is to ensure the accuracy of the test results. So, just keep in mind and strictly follow this step.
The other important point is that you do not open individual components until the instruction says so.
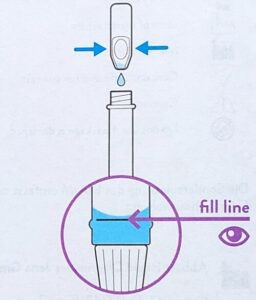
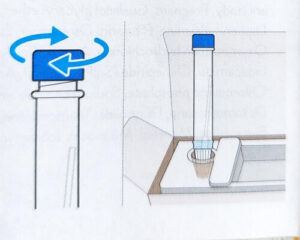
Alright, I am ready to start the test now. First step, open the Buffer Bottle and make sure you keep the Buffer Bottle upright when open. Then squeeze the liquid into the Tube. Squeeze at least twice. The liquid level should be at or slightly above the fill line on the side of the Tube. Put the Tube into the Kit Box Tray holder before proceeding to the next step.

Now, open the Swab package at the stick end and take the Swab out. Remember, DO NOT touch or hold the cotton bud part!

Collect the Nasal Sample
Next, the most irritating step, swab both of your nostrils to collect the nasal sample 😓! At this step, you will need to insert the soft end of the Swab straight back into your nostril. Don’t worry, you don’t have to insert the entire stick into your nostrils, phew…
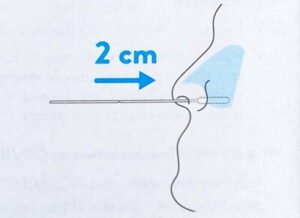
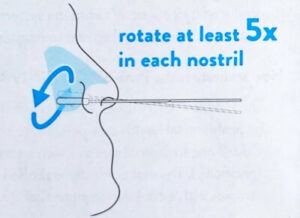
Just insert until you feel resistance, it would be about 2 cm into your nostril. Slowly rotate the Swab, gently rubbing it along the insides of your nasal passage at least 5 times. Remove Swab from your nostril and repeat this step in your other nostril using the same Swab.
Remember to swab BOTH of your nostrils.
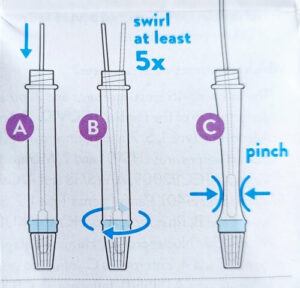
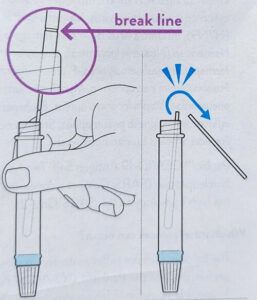
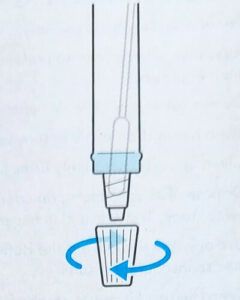
Next, insert the Swab into the Tube. You will need to swirl in the fluid 5 or more times while pushing against the wall of the Tube. Pinch the Swab tip through the Tube to remove any remaining fluid. Now, snap the Swab handle at the break line and leave the Swab in the Tube. Lastly, secure the Blue Cap on the top of the Tube. Return the Tube to the Kit Box Tray holder and you are good to proceed to the next step to perform the test.
Perform the Test
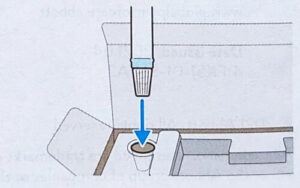
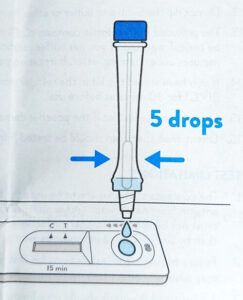
First, remove the Test Device from its protective package and place it on a well-lit, flat surface. Next, make sure there are no bubbles on the liquid as it can lead to inaccurate results. Now, keep the Tube vertical with the white cap pointed down. Remove the white cap and squeeze 5 drops of liquid from the Tube into the well on the Test Device. Secure white cap back on Tube and wait for 15 minutes.
During the 15 minutes, keep the Test Device flat on the table and DO NOT touch the Test Device. You may read the result between the 15th to 20th minutes. After 20 minutes, the result might become inaccurate.
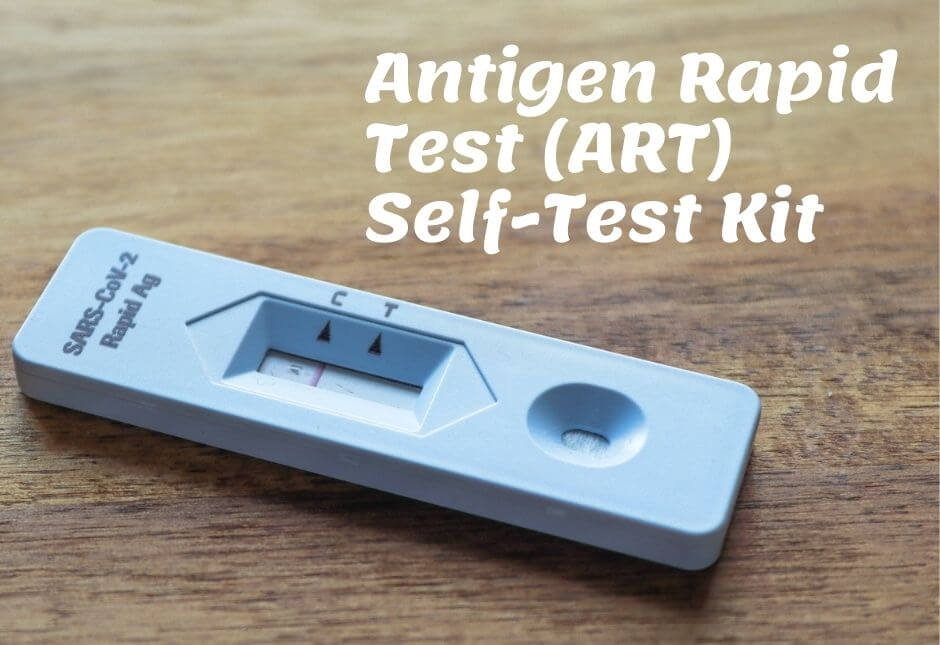
Note: A Control (C) line may appear in the result window within a few minutes, but a Test (T) line may take as long as 15 minutes to appear.
Read the Result
There are 3 possible results:
- Invalid Result
- Positive Result
- Negative Result
Invalid Result
When you don’t see the Control (C) line present on the result window, it means that your test has failed and did not work. This may be due to incorrect test procedure.
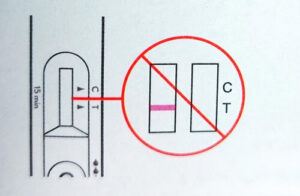
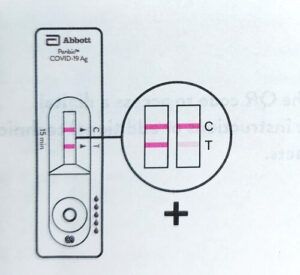
Positive Result
If you see two lines, the Control (C) line and the Test (T) line, this means that COVID-19 was detected! 😱 Please take a photo of your ART test result with your NRIC or passport in the same photo immediately. Then visit a Swab And Send Home (SASH) clinic for a confirmatory Polymerase Chain Reaction (PRC) test. You may find the list of SASH clinics at phpc.gov.sg.
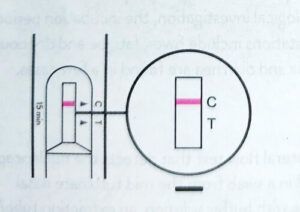
Negative Result
If you see only the Control (C) line is present, this means that COVID-19 was not detected. 😅
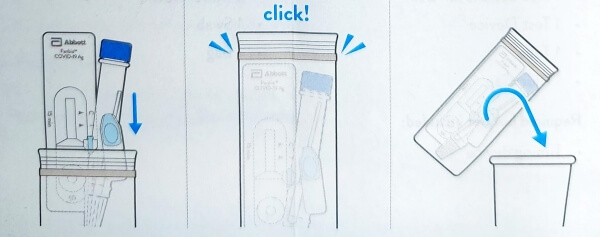
Dispose the Test Kit
Lastly, place the Swab, Tube and Test Device into the Bag. Then seal the Bag tightly and throw the Bag in a waste bin. That’s all. You have completed the ART test.
Closing Words
Antigen Rapid Test self-test kit is indeed a very easy and convenient DIY self-test screening tool. You can easily do it at home and get the test result in less than 20 minutes. However, you should keep in mind that if you get a negative test result, it doesn’t mean that you don’t have Covid-19. It just means that you are unlikely to have it.
However, I felt that the cost of the self-test kit is a bit too high if you want to do it on a regular basis. This is just my personal thought. 😉
Stay safe, stay vigilant! 💪
PS: Subscribe to my mailing list so that I can notify you of my new blog posts.


Be First to Comment